Showing posts with label vintage fall. Show all posts

Thursday, September 7, 2017

Cocktail of the Month-September: Old Fashioned

Labor Day- summer is coming to an end, but it's not quite fall. As we thought about a drink that captured this feeling, we decided to feature the classic Old Fashioned with a few variations.

The Old Fashioned is among the most classic of cocktails.  References to this classic bourbon (or whiskey) drink date back to 1806; it may in fact have been THE original cocktail. What we do know: in the 1800's a cocktail was comprised of bitters, a sugar cube, a dash of water and your spirit of choice- you could order one with most any alcohol as the base. Sometime in the late 1800's the bourbon variety picked up the Old Fashioned moniker- leading to the idea that it may have been the original, or just the one that best stood the test of time.

What we love most about this drink is it's simplicity. Free from the over sweetness of many modern cocktails, you can really enjoy the bourbon you are paying for - which incidentally means you should start with a bourbon you enjoy straight.

Traditional Old Fashioned recipes call for a sugar cube muddled with a few dashes of bitters and a splash of water. Although this is ideal, most agree that a rich simple sugar (2:1 ration sugar to water) is a reasonable replacement. (Use about 1\3 oz of rich simple syrup/drink).

We also tried a few variations on the Old Fashioned- although they are not traditional. We found that using a fruit bourbon- cherry and peach specifically- brought us a flavor profile that reminded us of the summer to fall transition. We omitted the sugar cube, using just a few dashes of bitters and the bourbon - plus ice. as the fruit bourbons are sweeter on their own, Purists would gasp, I am sure, but if you are just experimenting give it a try!


Cheers and Happy Fall!
Christine and Stacy

Tuesday, October 18, 2016

An Alternative Fall - Home Decor


Well, we had SO much fun creating pumpkins for our earlier Fabric Pumpkins Blog Post, and had so many compliments on them at a show we attended over weekend, we decided to share with all of you how wee incorporated them into our personal home decors. These pumpkins are fairly easy to make and perfect for adding a custom look to your house from early fall through Thanksgiving. Just pick a fabric or 2 or 3...that coordinates with your style, and get started...  As mentioned in our previous post, Stacy and Christine have different styles and created very different pumpkins, which of course carries over to our differently styled homes!  Everyone's home should be a reflection of their personal comfort and style. We would love to see pics of your style with your pumpkins!!

Antique Sideboard display - Out 2 Lunch 
My style (Stacy) definitely tends towards a classic coastal look; bare feet, the moon on the water, the breeze in a clear blue sky, the deep shade of moss covered oaks - these are the happy places I travel in my mind, and the decor of my home helps take me there. I grew up on the shores of Lake Ontario, and lived many years of my adult life in Charleston, SC - I am drawn to the water and find peace there. With three elementary age children, peace is a valuable commodity in our house!! When we made our pumpkins, I chose fabrics that echoed the sand, sky and water. In addition the paisley fabric was a baby sling I used with my youngest- I held on to it for over 6 years, waiting for the right project.
Beach Pumpkin- Out 2 Lunch 

Fall is one of my favorite times of year, to enjoy the outdoors and the changing of the seasons.  However, it IS NOT my favorite time of year to decorate my house. I'm not a big fan of creepy Halloween, so that doesn't leave a lot of options. My children love to decorate their play space with whimsical Halloween, and I am glad to finally have something that captures my style.

Each piece I feature in my decor has meaning for me, from family pictures to handed down furniture, to items sent to us by friends living far away. The fisherman in this area was a treasure we found going through my grandmother's belongings. Although she lived in Kansas      and Texas for most of her life, he was the perfect memento to add to the driftwood and fossilized rock my children collected in Charleston.


 I love that these pumpkins can add the warmth of fall without replacing my existing decor - they just seemed to fit in seamlessly - other than the large blue pumpkin in this picture. I loved that it was a "life size" pumpkin; lesson learned... consider the space before you create!


                                        ________________________________

Fabric pumpkins, milk glass decor - Out 2 Lunch Designs
For me (Christine), fall and the holidays are about textures and feeling.  I love the crisp cool weather that comes in at fall.  I love the changes all around me from the lush green, hot sun of summer, to vivid colors, and cooler nights, fire places lit up, and jeans, boots, and sweaters replacing tees and shorts.  With each season I enjoy and embrace the change-over.  I spent the bulk of my formative years in North Carolina, and love the distinct changes of seasons evident in areas from the coastal Outer Banks to the Blue Ridge and Smoky Mountains!   As always, I am drawn to shiny, sparkly, glam textures, as well as vintage styles and nature.

Black Velvet Pumpkin
My fall most definitely incorporates a mix of natural elements along with vintage and sparkly/shiny items (milk glass, glam vintage fabrics, shiny accessories with rocks, twigs, etc).  With the coziness of fall I also always look forward to incorporating lush textures - my hands-down favorite? Velvet!

 
Fall Mantle  via Out 2 Lunch Designs


Over the last couple years, my home has taken on a more neutral mid-tones look, incorporating mixes of grays, greens, taupes, and golds in various combinations; so I stuck to those colors with my pumpkins, letting the mix of natural stems, and glam fabrics shine.  And of course, I paired them with my fave classic, vintage milk glass, plus other elements like: glass, rocks, pottery, and textiles.  Some of my little pumpkins even show up in my Fall/Thanksgiving table set-up...but that, dear reader, is for another post - stay tuned!  :)


If you follow our fabric pumpkin post and make your own, I hope you have as much fun with them as we did!  What I absolutely love about these are their versatility, and how everyone can make them to fit their own style and personality!  Happy Decorating!

Cheers,
Christine and Stacy

Tuesday, September 20, 2016

Vintage Fabric Pumpkins - DIY!!


With September, comes full-fledged pumpkin season!  It's pumpkin everything! - pumpkin spice coffees, pumpkin lattes, pumpkin bread, pumpkin bars, pumpkin decor.  If it's pumpkin, it's currently here! Pumpkin, Pumpkin, Pumpkin, Pumpkin...

So in the pumpkin spirit, we here at Out 2 Lunch got busy making some pumpkin decorations for our homes.  A couple years ago, I found this pinterest tutorial for velvet pumpkins that I loved.  I made a whole series of pumpkins in velvets and satins that now decorate my home, my mother's and mother-in-law's homes, as well as the homes of some of my friends.  I was on a pumpkin roll!

With our love here for vintage fabrics and creative re-purposing, Stacy and I decided to make some fabric fall pumpkins using re-purposed clothes.  We both picked some items (shirts, skirts, etc.) that fit the color scheme looks we each wanted.  You can definitely see some of our personality differences here!  Stacy chose some gorgeous blues/browns for a very beachy blue fall look.  And I definitely went for a more silver/black gothic glam look.


We had SO much fun making these and we're sharing our process as well as our hard-learned do's and do not's!

Have fun, re-purpose and we'd love to see your pics!  In fact, tag us on instagram (out2lunchdesigns) with your fabric pumpkin pics and we'll re-post them!

Materials:
     Clothing/Fabric to cut up 
     Doll Making or Decorator's Needles
      - very long sewing needles
     Dried Pumpkin Stems or Stick Pieces
     Heavy Duty Thread
     Cotton Stuffing
     Sharp Scissors
     Hot Glue Gun & Glue


Step One: Cutting
Cut your fabric into large circles (doesn't need to be exact).  Keep in mind that the pumpkin will be almost half the size of the circle when finished (ie- 12" circle will make roughly a 6-7" pumpkin).  For very large pumpkins, cut 20" or larger diameter circles.

Step Two: Sewing
Run a long, doubled piece of Heavy Duty Thread through your long needle.  Make sure to use strong thread (we had some break as were tying off our pumpkins, and had to start them all over)!  To sew the pumpkins start on one edge and run the needle around the edge using a loose up and down running stitch..  It doesn't have to be perfectly even, and a loose stitch 1/2" wide is fine.  Make sure though that you have enough thread to go all the way around with some hanging out each end.  The fabric will gather as you sew and push it along the thread.  Once stitched all the way around, gently pull the strings on both ends to gather the pumpkin in, leaving about a fist-sized hole at the top.


Step Three: Stuffing
Carefully stuff wads of cotton into the pumpkin to fill to desired plumpness.  More stuffing yields a rounder, more ball like pumpkin; slightly less stuffing makes a squattier, wider pumpkin.  Once stuffed, pull strings together to close stuffing hole and tie into a knot. Be gentle with this - this is where we broke some threads!


Step Four: Finishing
You now have a nice round stuffed ball.  Re-thread your long needle and knot the end.  Run your needle/thread back and forth across the edges of the closed off hole a couple times, just to pull them tighter together, tie off thread.  Next, run your needle/thread straight down through the gathered edges, through the pumpkin, and out the bottom of the pumpkin.  Turn your needle around and run it back up.  Repeat this step a couple times, gently pulling the top and bottom of the pumpkin towards each other.  Knot and cut off thread when done.  This will indent the top and bottom to form a more realistic pumpkin shape.  You will really need the long doll needles for this step, especially with the larger sized pumpkins!

Step Five: Stem
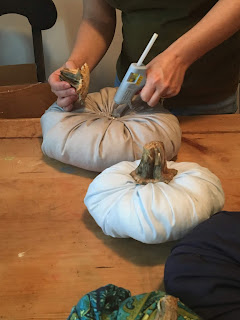
Once all sewn, select the dried pumpkin stem of your choice and hot glue the stem to the top of your pumpkin.  Pumpkin stems can sometimes be obtained from farms and pumpkin patches.  There are numerous options for sale on ebay and Amazon.  I have also seen pumpkins made using a stick piece for the stem.  Whichever stem option you choose, make sure it is well dried so it does not rot or mold.


Then display your pumpkin and enjoy it for years to come!   

Happy Fall Y'all!!


Cheers,
Christine!