Tuesday, September 20, 2016

Vintage Fabric Pumpkins - DIY!!


With September, comes full-fledged pumpkin season!  It's pumpkin everything! - pumpkin spice coffees, pumpkin lattes, pumpkin bread, pumpkin bars, pumpkin decor.  If it's pumpkin, it's currently here! Pumpkin, Pumpkin, Pumpkin, Pumpkin...

So in the pumpkin spirit, we here at Out 2 Lunch got busy making some pumpkin decorations for our homes.  A couple years ago, I found this pinterest tutorial for velvet pumpkins that I loved.  I made a whole series of pumpkins in velvets and satins that now decorate my home, my mother's and mother-in-law's homes, as well as the homes of some of my friends.  I was on a pumpkin roll!

With our love here for vintage fabrics and creative re-purposing, Stacy and I decided to make some fabric fall pumpkins using re-purposed clothes.  We both picked some items (shirts, skirts, etc.) that fit the color scheme looks we each wanted.  You can definitely see some of our personality differences here!  Stacy chose some gorgeous blues/browns for a very beachy blue fall look.  And I definitely went for a more silver/black gothic glam look.


We had SO much fun making these and we're sharing our process as well as our hard-learned do's and do not's!

Have fun, re-purpose and we'd love to see your pics!  In fact, tag us on instagram (out2lunchdesigns) with your fabric pumpkin pics and we'll re-post them!

Materials:
     Clothing/Fabric to cut up 
     Doll Making or Decorator's Needles
      - very long sewing needles
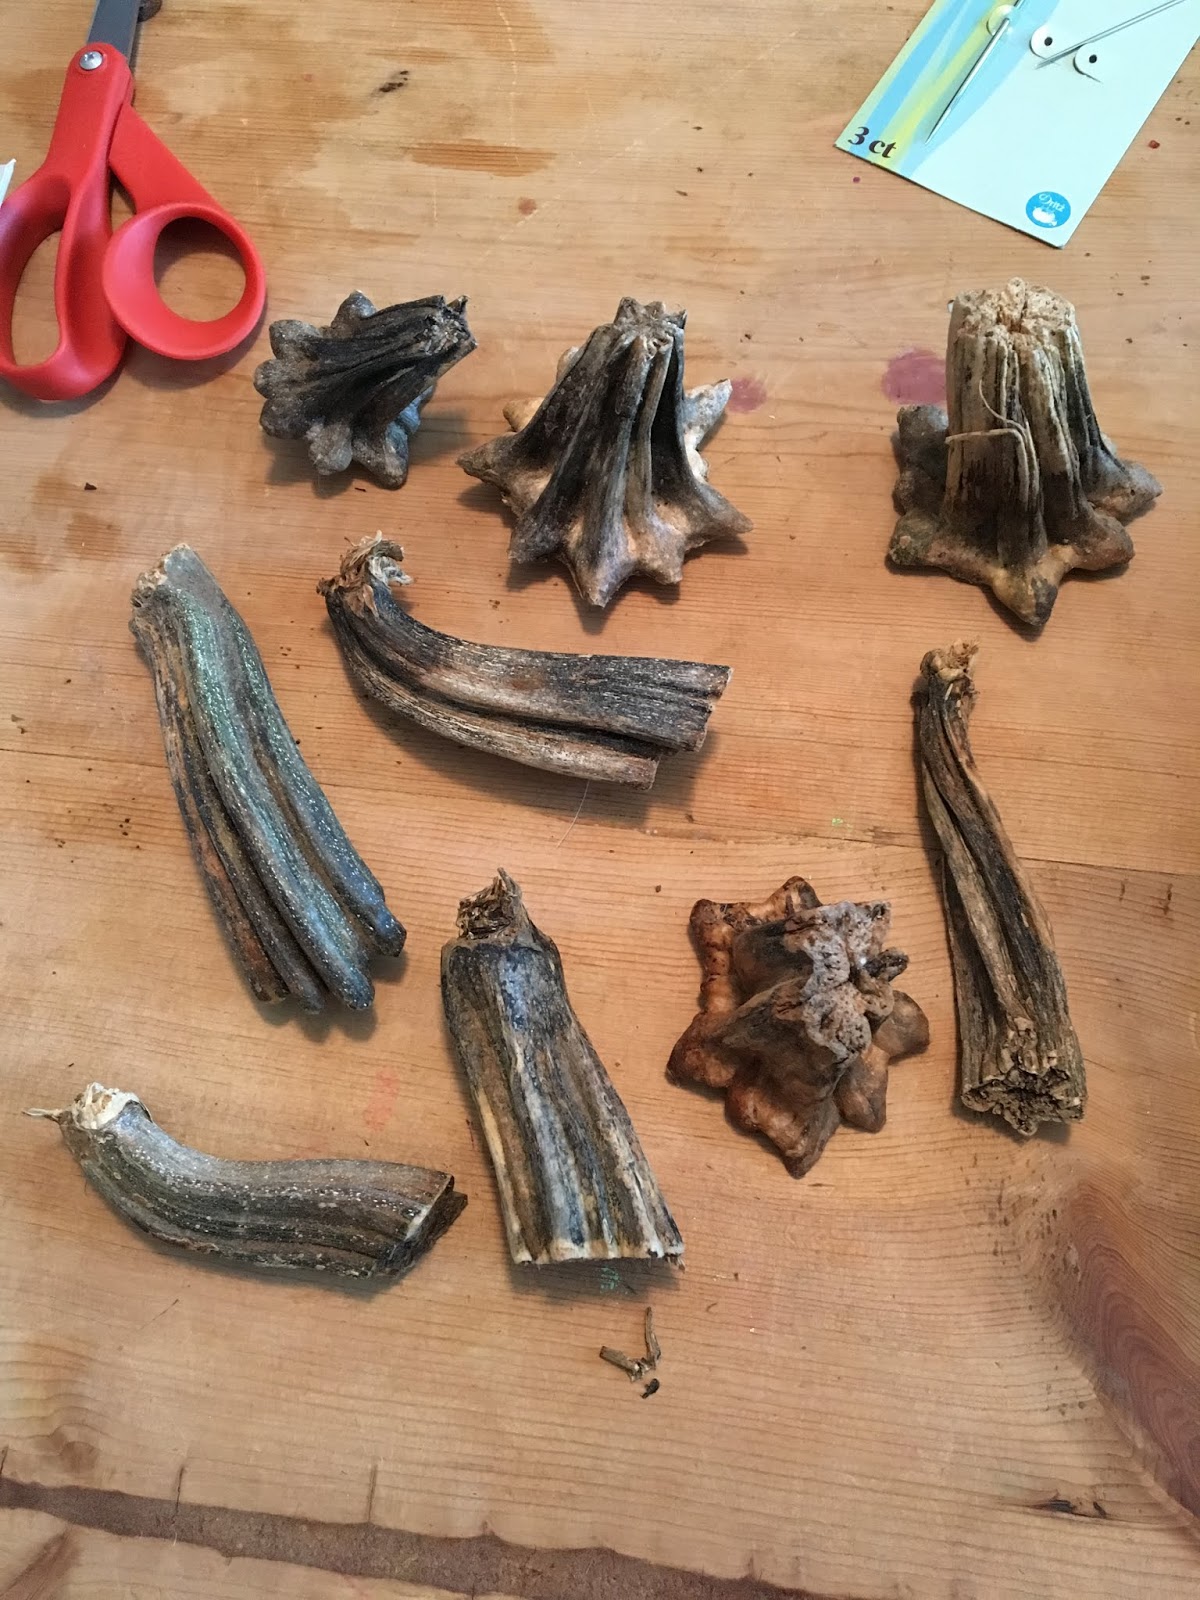
     Dried Pumpkin Stems or Stick Pieces
     Heavy Duty Thread
     Cotton Stuffing
     Sharp Scissors
     Hot Glue Gun & Glue


Step One: Cutting
Cut your fabric into large circles (doesn't need to be exact).  Keep in mind that the pumpkin will be almost half the size of the circle when finished (ie- 12" circle will make roughly a 6-7" pumpkin).  For very large pumpkins, cut 20" or larger diameter circles.

Step Two: Sewing
Run a long, doubled piece of Heavy Duty Thread through your long needle.  Make sure to use strong thread (we had some break as were tying off our pumpkins, and had to start them all over)!  To sew the pumpkins start on one edge and run the needle around the edge using a loose up and down running stitch..  It doesn't have to be perfectly even, and a loose stitch 1/2" wide is fine.  Make sure though that you have enough thread to go all the way around with some hanging out each end.  The fabric will gather as you sew and push it along the thread.  Once stitched all the way around, gently pull the strings on both ends to gather the pumpkin in, leaving about a fist-sized hole at the top.


Step Three: Stuffing
Carefully stuff wads of cotton into the pumpkin to fill to desired plumpness.  More stuffing yields a rounder, more ball like pumpkin; slightly less stuffing makes a squattier, wider pumpkin.  Once stuffed, pull strings together to close stuffing hole and tie into a knot. Be gentle with this - this is where we broke some threads!


Step Four: Finishing
You now have a nice round stuffed ball.  Re-thread your long needle and knot the end.  Run your needle/thread back and forth across the edges of the closed off hole a couple times, just to pull them tighter together, tie off thread.  Next, run your needle/thread straight down through the gathered edges, through the pumpkin, and out the bottom of the pumpkin.  Turn your needle around and run it back up.  Repeat this step a couple times, gently pulling the top and bottom of the pumpkin towards each other.  Knot and cut off thread when done.  This will indent the top and bottom to form a more realistic pumpkin shape.  You will really need the long doll needles for this step, especially with the larger sized pumpkins!

Step Five: Stem
Once all sewn, select the dried pumpkin stem of your choice and hot glue the stem to the top of your pumpkin.  Pumpkin stems can sometimes be obtained from farms and pumpkin patches.  There are numerous options for sale on ebay and Amazon.  I have also seen pumpkins made using a stick piece for the stem.  Whichever stem option you choose, make sure it is well dried so it does not rot or mold.


Then display your pumpkin and enjoy it for years to come!   

Happy Fall Y'all!!


Cheers,
Christine!

Tuesday, September 6, 2016

Up-cycled Fairy Garden Door - DIY


"Above all, watch with glittering eyes the whole world around you, because the greatest secrets are always hidden in the most unlikely places.  Those who don't believe in magic will never find it." 
                                                                                     -Roald Dahl

Ahhh...A fairy/elf door.  Such a simple, fun little piece, but one which sets the mind to wandering the realms of dreams, and puts just a little magic in the moment, leaving a smile upon the face.  The whimsical "what if" of a fairy door always makes me smile.  Even better, if one can catch you off-guard, hidden in an unexpected place, a moment you didn't expect!  This past summer, my children and I had a lot of fun putting in a whimsical fairy/creature garden (as they call it) along the back side of our garage.  What started out as just a fun family project, has given back more than I expected; I continuously find myself smiling as I walk along it, feeling my mood and spirit lighten.

I have lately been re-landscaping the front of our house.  One of my projects, has been to add wooded paths through the "natural areas".  I began to contemplate how fun it would be to add a fairy door hidden at the base of a tree, an unexpected whimsy, should one happen to notice it.  My budget, however, for a project, was nil!  Well, I started scrounging around the house and yard, and I must admit, the end result has me entranced!  I hope you like it too, and maybe, just maybe, get inspired to add a bit of whimsical magic to your yard!  If you do, I would love to see your pictures!

Here's how mine came together!
Materials:
  • Piece of Slate, Bark, Wood, Tile, etc. for the door base
  • River Rocks
  • E-6000 glue
  • Round plastic jewelry bezel
  • Round Clear Gem Sequin
  • Acorn cap
  • Marble
  • Bobby pin
  • File

I started with a small piece of left-over slate from our pathway project, (any piece of tile, wood, bark, etc would also suffice).  In the garage, I still had some left-over river rocks in a bag from some planting projects - that would nicely frame the "door".  Next, how to make the door look like a door...Up in my craft space, I located a large plastic ring/bezel from an old button bin, and a left-over clear gem sequin from a project with my daughter.  As the gem fit inside the bezel, I decided it would form a perfect little "window".  I found a broken bracelet clasp which looked like a door ring for a miniature door.  Now, my door at home has a light beside it, and I had seen ideas to use marbles as lights in fairy gardens.  So...a search outside produced the perfect acorn cap to top a marble and a search under the living room sofas produced the perfect "lost" marble!  I am totally feeling like Tinkerbell, creating something out of "lost things" and loving it!!  A piece of bobby pin would work for a light hanger, glue to put it all together, and I'm heading downstairs for assembly!  Let's Do This!!

Here We Go: (bonus points if you read that sounding like Peter Pan!)

Step One: Making the door frame.  I began by propping my slate piece upright against a coffee mug.  I put the bottom on a rubber gripper for opening jars, (to prevent slipping), and used a circle of tape to help hold it to the mug, (to prevent tipping).  Next I put glue on the side edge of two river rocks and placed them snug against the slate on either side.  Let that dry a bit.  The next part is a repetitive stacking process: spreading glue on the bottom and side edge of a rock and placing it on top of the previous rock, snugged up against the slate "door".  I found I could usually stack about 3 rocks at a time, then needed to let the glue dry to firm up.  As the door frames on each side grew taller, I used mugs against the rocks to keep them from slipping and falling while the glue was drying.  This process took several hours of stacking and drying.  Also important to note, that I did this while my children were in school and there was no one to "thunder" through the house, which helped in holding the rock stacks steady!

Step Two: Making the door top.  Once my rocks had reached level with the top of the "door" and the side rocks had dried firmly, I began on the top.  I found a series of relatively flat, long rocks that when placed end to end would stretch across the top of the door, including over the side rocks.  These pieces definitely required careful placement and balancing until dried firm.  Two more layers provided a nice door top thickness.  Tall mugs and even mugs stacked on mugs assisted with stability until the rocks firm in place.  Let it dry.


Step Three: Making the door step.  For this part, I actually lined up the rocks I wanted to use, on my rubber mat.  I then spread the glue across the rocks and set the dried "door" on top of the rocks, propped as before against a mug.  If you find that a rock is smaller than the others and does not stick up enough to stick to the bottom of the door, lift it with a bit of paper or something underneath, (the bottom of the "door" does not have to be perfectly even, as you are going to dig it into the dirt).  You can use as many layers or rocks as you like, forming your "door" to your own specifications.  Let it dry.  Once the door could be moved and laid flat, I placed it face down and added some extra glue on the back, just to make sure everything was really stuck together!  Then, let that dry!

Step Four: Accessorize the door!  Here's where it gets really fun!  I had already decided on my bezel ring and clear gem window, so laying the door down flat, I first glued my bezel in place where I wanted the little window to be.  The gem had a mirror backing to make it shiny, but I really wanted the "window" to resemble glass, (which typically has a clear, but darker look to it).  Taking a file, I decided to see if I could remove the mirror backing from the gem.  It worked like a charm!  Filing the backing off did make the gem "whiter" with the scratches, however those disappeared and the gem went completely clear as soon as the glue filled them in.  With the window gem in place, the jewelry clasp door ring was glued on next, and then to make the "light"!  For the light accessory, I glued the marble into the acorn cap and let it set.  Next, I took a bobby pin and cut/broke off part of it, so I had a straight section.  Using a pair of small pliers, I bent the metal piece into a curve and glued it to the top of the acorn cap.  Once the glue for the "light" was dry, I glued the light post end to the door frame rocks.  Let it all dry!

I let my fairy door sit for a day to make sure everything was fully dried, then went out and placed it/dug it into the ground underneath a tree.  A couple rocks helped to fill any gaps, some moss provided "bushes", and some larger rocks I had from our previous fairy garden provided a lovely path leading up to the door.  And now?  Let the magical moments, the day-dreams, and smiles begin!


"Those who dream by day are cognizant of many things which escape those who dream only by night." - Edgar Allen Poe

Cheers,
Christine 

Tuesday, August 23, 2016

Up-cycled Garden Orbs, DIY - using Whiskey Barrel Bands!


Nowhere is creative up-cycling more prevalent than in gardens.  One need only spend a short time searching Pinterest to discover a vast array of ideas for re-using almost anything in a garden.  Of course, personal style always plays a large part in one's garden.  Today, I'm going to begin a series of up-cycled garden posts.  Lately, I've been trying to improve the landscaping around our house; now that we've finally moved past the large, plastic toy lawn ornaments, that seemed destined to forever out-compete any and all flowers for "pops of color"!

The first thing I wanted to add to my garden beds was structure.  I like natural elements, (rocks, logs), and also intriguing, artistic objects, (wrought iron trellises, obelisks, orbs, etc.)  It doesn't take long, however, searching garden centers and online retailers, to learn that those lovely, park-like gardens I dream about cost nothing short of a small fortune!  So, how to begin creating my dream-park on virtually no budget.....

Whiskey Barrel Bands
Well, the first piece quite literally fell in my lap, or perhaps I should say, disintegrated onto my foot this past spring!  A number of years ago, my husband and I had put in a raised herb garden using half-whiskey barrel planters.  Now, many years later, those barrels were disintegrating and falling apart.  It was time to replace/re-create the herb garden.  As we were dragging and shoveling the old pieces of barrel away,  and I was stacking their steel metal bands off to the side, it occurred to me that these could make cool garden orbs.  "I wonder how hard it would be to attach these together?", I thought.  Insert handy husband here, and the answer turned out to be, "not too difficult!" 

Here's how we did it:
Materials:
  • Old whiskey barrel bands (2-6, depending on orb, and whether making a base or not)
  • Pop rivets, and pop-rivet tool (very technical, I know)
  • Electric drill
  • Drill bit slightly larger than the width of your pop rivets
  • Clamps, c-clamps or vice grips (3 or 4 are helpful)
  • Bolts (if attaching to a base)
  • Saw (if making a base)
  • Protective eye-wear and work gloves
  • Splitting wedge and heavy mallet (if putting a base in the ground)
  • Quick-crete concrete (optional) 
Drilling through the metal bands
Step One:
The Ball.  Match up similar size bands.  For this one, I used 4-same size med-lg bands, plus two smaller bands for the base, (6 total).  Place 3 circle bands together so that they all cross at the top and bottom, forming a ball shape, (you can measure, but I just eye-balled it).  Mark cross spots with a pencil or sharpie if desired, or just clamp together with tight clamps at the top and bottom.  Make sure your bands are evenly spaced to form a nice ball (2 bands will make a more open ball).
Inserting pop-rivets through drilled holes


Once tightly clamped, drill (slowly and carefully, wearing protective eye-wear and gloves) down through all 3 band layers.  Handy husband used a piece of 2"x4" wood, or section of pvc pipe at times to help brace the bands from the inside while drilling.

Once drilled through, insert pop rivet through hole and pop into place with pop-rivet tool!  Repeat the process for the bottom cross.  You now have a nice banded ball!

4th band pop-riveted on
Step Two:
For this orb, I wanted a 4th band running around crossing the circles middles.  So, I took the 4th matching size band and placed it around the other circles, clamping it into place.  Handy husband drilled 3 more holes (one on each band of the ball-we only needed to attach it in 3 places rather than all 6 bands it crossed), and pop riveted it on.  At this point I had a lovely criss-crossed sphere, and in fact, am now in the process of making another which will stay exactly like this, as a ball, nestled on the ground among some plants.  But for this one..

Crossed base pieces


Step Three:
The Base.  I wanted to raise this orb up, like some of those lovely "park-like" garden structures.  So...I took two of the smaller circle bands and handy husband cut them each open with a saw.  We then crossed them in the middle, clamped them together, and like before, drilled, and pop-riveted them together.  This gave me a crossed base piece.


Step Four:
Installation.  We're getting close now!  I placed the 4 base piece points/ends where I wanted them in the garden.  If you live in an area with soft ground, you may be able to push them down into the ground.  However, here in the south with our lovely clay, handy husband used a wood-splitting wedge and large mallet to hammer 4 holes into the ground.  We then pressed the 4 ends of the base into the holes and filled around them with dirt.  Just for good measure, we also poured some quick-crete concrete into the holes with a bit of water to set it.


Step Five:
Final Assembly.  Once the base was in place, I set my orb on top and lined up where I wanted it to sit.  We marked the spots and clamped it on tight.  Once again, handy husband drilled out two holes each through an orb band and base band.  This time we attached the pieces together with bolts, for extra strength as the orb would be subjected to pressure from winds and we didn't want it to snap off the base.  And Voila!!  Up-cycled Garden Orb!!
Garden orb bolted to base pieces


I have now planted ivy at the base of my garden orb and am hoping to get it to twine through the structure as it grows!

This project is easily adaptable for more or less bands, no base, or other bases, wherever your artistic whimsy takes you!  I am already planning other orb incarnations with my left-over pieces, and would love to see pictures of yours!   Enjoy and Have Fun!

Cheers,
Christine
www.out2lunchdesigns.com

Thursday, August 4, 2016

Ready or Not


Photo: Stacy, Out 2 Lunch, LLC


Although it has been over 90 degrees for the past few weeks, and I would like nothing more than to spend my days at the beach and the pool, we all must admit at some point that Back to School time is here. If you read Christine’s last blog post , you know that Pantone has released their Fall 2016 color palette; stores are stocking up on school supplies and pumpkins; my fall loving friends are dreaming of apples and pumpkin spice.  As a native of Western New York, I fondly look back on the cool crispness of fall mornings, the changing leaves, the fresh pressed apple cider at Sanger Farms and peaches from Tom Tower’s Farm that signaled it was time to go back to school. Here in the south, it is without a doubt still summer when our children return to school.  Some of our friends in NC attend year round school, which means that they begin a new school year just after Independence Day, other schools across the Southeast begin between mid August and just after Labor Day.  Regardless of start date, southern children often transition directly from swimwear and sandals to school clothes – with plenty of beach and pool trips on the weekends. 

Hair Bows: Out 2 Lunch; Photo: Stacy, Out 2 Lunch

Whether Back to School means fall weather or an extension of summer, everyone enjoys the chance to purchase back to school clothes and school supplies. And as more schools (both public and private) have added uniforms, accessorizing becomes a great way for children of all ages to express their personalities.  Both Christine and myself have children that are full of personality and attend schools that require uniforms. This makes our Out 2 Lunch accessories the perfect way for all of their friends to express their styles.  Children, like our products, are truly one of a kind. 

     
Choosing Fabrics....   
When I decided to blog about Back to School fashions, I  must have felt like fall was further away than it is was.  I decided that moving, finding new schools, and running a business wasn’t busy enough, and I added a little extra challenge to this project.  I put a call out to my children and their friends (ranging from rising Kindergarten to 5th grade) and asked them to participate in a Back to School photo shoot – that part was easy enough, we had plenty of adorable models step into the limelight. From there I upped the ante a bit – I told the parents that I wanted each child’s clothing to reflect their personality, they could wear uniforms or not, and I would create accessories to compliment both the colors and their styles. My young models came through with flying colors – their personalities shine through, and I had a great time creating for some of my favorite people.

Below I will feature our products that are most commonly used as school accessories.  For those of you that are new to Out 2 Lunch I will also be giving a brief description of each item and its name.  When we began our business, we wanted to create accessories that would bring a modern twist to any “out to lunch” wardrobe (hence the name….) ranging from a formal garden party, to a casual picnic, to lunch out with friends. As we developed new products we named them after some of our favorite southern luncheon staples – items whose traits are reflected in the products.  I hope that you enjoy and can find some accessories that are useful and bring personality to your childrens’ back to school wardrobe! 

Hair Pin, Hair Bow and Organizer: Out 2 Lunch, LLC

Photo: Stacy, Out 2 Lunch, LLC
Fried Pickle (Tie Wallet) – Like one of our favorite appetizers, these little guys aren’t fancy or elaborate.  They are functional with a twist of fun.  There is some variation to the dimensions of these tie wallets, as there is variation in neckties.  Each wallet comfortably fits several standard size credit/gift cards, and secures with a snap closure.  These little wallets are perfect for holding earbuds, so that they do not tangle in backpacks and purses.  For older students, they are also perfect for carrying flash drives and student ID cards.

Organizers and Bows: Out 2 Lunch
Sweet Tea (Snap Pocket Organizer) - The most versatile carry-anything soft pocket you'll find! This one will show up everywhere! With its cute envelope styling, you can pack it full of sunglasses, make-up, art supplies, or use it as a pencil case! Just throw it in your backpack and you are ready for homework anywhere.   It's even cute and stylish enough to just grab and go!

Hair Pin and Purse: Out 2 Lunch
Lemonade (Denim Purse) - Comfortable and easy as your favorite old jeans - oh wait, they practically are! These denim "jeans" bags are cute, fun, relaxed and in the smaller sizes they are perfect for any age. Each has its dimensions listed on the website, has a magnetic snap closure.  They are perfect for an afternoon at the mall, and hardy enough to be carried in your backpack during the day.

Bow and Organizer: Out 2 Lunch, LLC
Divinity (Hair Bow) - Delightful, fun, and a little "nutty"; these hair clip bows bring a vintage twist to an everyday classic.  Bows vary in size.  Each is created on a covered alligator clip, and includes a piece of vintage jewelry as accent. There's something for everyone-  all ages and hair-styles -  to love!  Simply divine! 

Hair Pin: Out 2 Lunch, LLC
Praline (Hair Pin) - Fancy and everyday at the same time, these hair pins can dress up your day to day and add sparkle to any formal occasion as well.  A perfect accent to short hair or a dramatic updo!!


These products can be found for sale on our website (www.out2lunchdesigns.com) and are also featured on out Facebook, Pinterest and Instagram. If you are looking for a specific color group or style, please email us at out2lunch@out2lunchdesigns.com.  We can only feature a limited number of products on our website, as each is one of a kind, but we have a back stock and can help you find what you are looking for! In addition, the Fried Pickle and Sweet Tea will be on sale – 20% off!! -  through the end of August. 

I'd like to close with a special thanks to all my models, and their parents, that braved 90 degree temps, and what felt like 90% humidity.  I couldn't have done it without you, thanks for letting your personality shine through! You can see more of them on our website and instagram!  
Sophia: Gr 1, Lily and Louisa: Gr 2
Evelyn: Kindergarten
Ava and Clara: Gr 4, Makayla Gr 5