Tuesday, September 20, 2016

Vintage Fabric Pumpkins - DIY!!


With September, comes full-fledged pumpkin season!  It's pumpkin everything! - pumpkin spice coffees, pumpkin lattes, pumpkin bread, pumpkin bars, pumpkin decor.  If it's pumpkin, it's currently here! Pumpkin, Pumpkin, Pumpkin, Pumpkin...

So in the pumpkin spirit, we here at Out 2 Lunch got busy making some pumpkin decorations for our homes.  A couple years ago, I found this pinterest tutorial for velvet pumpkins that I loved.  I made a whole series of pumpkins in velvets and satins that now decorate my home, my mother's and mother-in-law's homes, as well as the homes of some of my friends.  I was on a pumpkin roll!

With our love here for vintage fabrics and creative re-purposing, Stacy and I decided to make some fabric fall pumpkins using re-purposed clothes.  We both picked some items (shirts, skirts, etc.) that fit the color scheme looks we each wanted.  You can definitely see some of our personality differences here!  Stacy chose some gorgeous blues/browns for a very beachy blue fall look.  And I definitely went for a more silver/black gothic glam look.


We had SO much fun making these and we're sharing our process as well as our hard-learned do's and do not's!

Have fun, re-purpose and we'd love to see your pics!  In fact, tag us on instagram (out2lunchdesigns) with your fabric pumpkin pics and we'll re-post them!

Materials:
     Clothing/Fabric to cut up 
     Doll Making or Decorator's Needles
      - very long sewing needles
     Dried Pumpkin Stems or Stick Pieces
     Heavy Duty Thread
     Cotton Stuffing
     Sharp Scissors
     Hot Glue Gun & Glue


Step One: Cutting
Cut your fabric into large circles (doesn't need to be exact).  Keep in mind that the pumpkin will be almost half the size of the circle when finished (ie- 12" circle will make roughly a 6-7" pumpkin).  For very large pumpkins, cut 20" or larger diameter circles.

Step Two: Sewing
Run a long, doubled piece of Heavy Duty Thread through your long needle.  Make sure to use strong thread (we had some break as were tying off our pumpkins, and had to start them all over)!  To sew the pumpkins start on one edge and run the needle around the edge using a loose up and down running stitch..  It doesn't have to be perfectly even, and a loose stitch 1/2" wide is fine.  Make sure though that you have enough thread to go all the way around with some hanging out each end.  The fabric will gather as you sew and push it along the thread.  Once stitched all the way around, gently pull the strings on both ends to gather the pumpkin in, leaving about a fist-sized hole at the top.


Step Three: Stuffing
Carefully stuff wads of cotton into the pumpkin to fill to desired plumpness.  More stuffing yields a rounder, more ball like pumpkin; slightly less stuffing makes a squattier, wider pumpkin.  Once stuffed, pull strings together to close stuffing hole and tie into a knot. Be gentle with this - this is where we broke some threads!


Step Four: Finishing
You now have a nice round stuffed ball.  Re-thread your long needle and knot the end.  Run your needle/thread back and forth across the edges of the closed off hole a couple times, just to pull them tighter together, tie off thread.  Next, run your needle/thread straight down through the gathered edges, through the pumpkin, and out the bottom of the pumpkin.  Turn your needle around and run it back up.  Repeat this step a couple times, gently pulling the top and bottom of the pumpkin towards each other.  Knot and cut off thread when done.  This will indent the top and bottom to form a more realistic pumpkin shape.  You will really need the long doll needles for this step, especially with the larger sized pumpkins!

Step Five: Stem
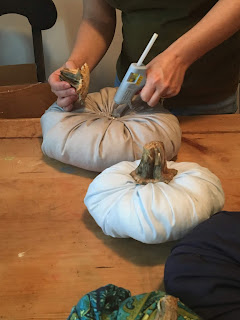
Once all sewn, select the dried pumpkin stem of your choice and hot glue the stem to the top of your pumpkin.  Pumpkin stems can sometimes be obtained from farms and pumpkin patches.  There are numerous options for sale on ebay and Amazon.  I have also seen pumpkins made using a stick piece for the stem.  Whichever stem option you choose, make sure it is well dried so it does not rot or mold.


Then display your pumpkin and enjoy it for years to come!   

Happy Fall Y'all!!


Cheers,
Christine!

Tuesday, September 6, 2016

Up-cycled Fairy Garden Door - DIY


"Above all, watch with glittering eyes the whole world around you, because the greatest secrets are always hidden in the most unlikely places.  Those who don't believe in magic will never find it." 
                                                                                     -Roald Dahl

Ahhh...A fairy/elf door.  Such a simple, fun little piece, but one which sets the mind to wandering the realms of dreams, and puts just a little magic in the moment, leaving a smile upon the face.  The whimsical "what if" of a fairy door always makes me smile.  Even better, if one can catch you off-guard, hidden in an unexpected place, a moment you didn't expect!  This past summer, my children and I had a lot of fun putting in a whimsical fairy/creature garden (as they call it) along the back side of our garage.  What started out as just a fun family project, has given back more than I expected; I continuously find myself smiling as I walk along it, feeling my mood and spirit lighten.

I have lately been re-landscaping the front of our house.  One of my projects, has been to add wooded paths through the "natural areas".  I began to contemplate how fun it would be to add a fairy door hidden at the base of a tree, an unexpected whimsy, should one happen to notice it.  My budget, however, for a project, was nil!  Well, I started scrounging around the house and yard, and I must admit, the end result has me entranced!  I hope you like it too, and maybe, just maybe, get inspired to add a bit of whimsical magic to your yard!  If you do, I would love to see your pictures!

Here's how mine came together!
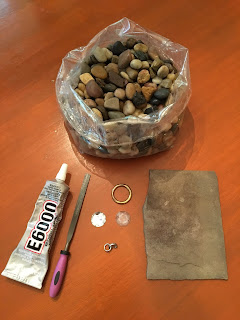
Materials:
  • Piece of Slate, Bark, Wood, Tile, etc. for the door base
  • River Rocks
  • E-6000 glue
  • Round plastic jewelry bezel
  • Round Clear Gem Sequin
  • Acorn cap
  • Marble
  • Bobby pin
  • File

I started with a small piece of left-over slate from our pathway project, (any piece of tile, wood, bark, etc would also suffice).  In the garage, I still had some left-over river rocks in a bag from some planting projects - that would nicely frame the "door".  Next, how to make the door look like a door...Up in my craft space, I located a large plastic ring/bezel from an old button bin, and a left-over clear gem sequin from a project with my daughter.  As the gem fit inside the bezel, I decided it would form a perfect little "window".  I found a broken bracelet clasp which looked like a door ring for a miniature door.  Now, my door at home has a light beside it, and I had seen ideas to use marbles as lights in fairy gardens.  So...a search outside produced the perfect acorn cap to top a marble and a search under the living room sofas produced the perfect "lost" marble!  I am totally feeling like Tinkerbell, creating something out of "lost things" and loving it!!  A piece of bobby pin would work for a light hanger, glue to put it all together, and I'm heading downstairs for assembly!  Let's Do This!!

Here We Go: (bonus points if you read that sounding like Peter Pan!)

Step One: Making the door frame.  I began by propping my slate piece upright against a coffee mug.  I put the bottom on a rubber gripper for opening jars, (to prevent slipping), and used a circle of tape to help hold it to the mug, (to prevent tipping).  Next I put glue on the side edge of two river rocks and placed them snug against the slate on either side.  Let that dry a bit.  The next part is a repetitive stacking process: spreading glue on the bottom and side edge of a rock and placing it on top of the previous rock, snugged up against the slate "door".  I found I could usually stack about 3 rocks at a time, then needed to let the glue dry to firm up.  As the door frames on each side grew taller, I used mugs against the rocks to keep them from slipping and falling while the glue was drying.  This process took several hours of stacking and drying.  Also important to note, that I did this while my children were in school and there was no one to "thunder" through the house, which helped in holding the rock stacks steady!

Step Two: Making the door top.  Once my rocks had reached level with the top of the "door" and the side rocks had dried firmly, I began on the top.  I found a series of relatively flat, long rocks that when placed end to end would stretch across the top of the door, including over the side rocks.  These pieces definitely required careful placement and balancing until dried firm.  Two more layers provided a nice door top thickness.  Tall mugs and even mugs stacked on mugs assisted with stability until the rocks firm in place.  Let it dry.


Step Three: Making the door step.  For this part, I actually lined up the rocks I wanted to use, on my rubber mat.  I then spread the glue across the rocks and set the dried "door" on top of the rocks, propped as before against a mug.  If you find that a rock is smaller than the others and does not stick up enough to stick to the bottom of the door, lift it with a bit of paper or something underneath, (the bottom of the "door" does not have to be perfectly even, as you are going to dig it into the dirt).  You can use as many layers or rocks as you like, forming your "door" to your own specifications.  Let it dry.  Once the door could be moved and laid flat, I placed it face down and added some extra glue on the back, just to make sure everything was really stuck together!  Then, let that dry!

Step Four: Accessorize the door!  Here's where it gets really fun!  I had already decided on my bezel ring and clear gem window, so laying the door down flat, I first glued my bezel in place where I wanted the little window to be.  The gem had a mirror backing to make it shiny, but I really wanted the "window" to resemble glass, (which typically has a clear, but darker look to it).  Taking a file, I decided to see if I could remove the mirror backing from the gem.  It worked like a charm!  Filing the backing off did make the gem "whiter" with the scratches, however those disappeared and the gem went completely clear as soon as the glue filled them in.  With the window gem in place, the jewelry clasp door ring was glued on next, and then to make the "light"!  For the light accessory, I glued the marble into the acorn cap and let it set.  Next, I took a bobby pin and cut/broke off part of it, so I had a straight section.  Using a pair of small pliers, I bent the metal piece into a curve and glued it to the top of the acorn cap.  Once the glue for the "light" was dry, I glued the light post end to the door frame rocks.  Let it all dry!

I let my fairy door sit for a day to make sure everything was fully dried, then went out and placed it/dug it into the ground underneath a tree.  A couple rocks helped to fill any gaps, some moss provided "bushes", and some larger rocks I had from our previous fairy garden provided a lovely path leading up to the door.  And now?  Let the magical moments, the day-dreams, and smiles begin!


"Those who dream by day are cognizant of many things which escape those who dream only by night." - Edgar Allen Poe

Cheers,
Christine