Saturday, December 23, 2017

Cocktails of the Month - Year Two (January: Champagne Cocktail)

As we close out our year of Classic Cocktails, as with the close of any year, we have taken some time to look back and to look forward. We have enjoyed learning about (and sampling) some fantastic classic gems- discovering some forgotten treats and learning to make some favorites that were previously intimidating (we’re looking at you, mint julep and eggnog). We had such a ball, that we are going to challenge ourselves with round 2 - can we find another 12 months of fun, classic drinks to share with you? Stay tuned to see what long lost treasures we unearth....

We are kicking off the year with an early pre-January post, perfect for a last minute addition to your Christmas menu or to add some flair to your New Year’s toast. The Champagne Cocktail has been making a resurgence over the last several years, with the addition of various flavored liquors, but it is just as good in its simplest form.

While the recipe was first published in a bar tenders guide in 1862, there were prior references in journals and diaries that indicate this cocktail was in general use a good bit earlier. Although French purists turned their noses up at the idea of adulterating fine champagne, most people enjoyed both the flavor and added bit of fun that came with this drink. Here are a few helpful tips if you want to give it a try...


1. Use a real sugar cube - not loose sugar or a crushed cube. Primarily you are not looking to sweeten the drink, but to create an even more bubbly experience. This best happens as the sugar cube slowly dissolves.

2. Place a few splashes of bitters on a small plate, and dip each side of  the sugar cube into it. We tried several methods and found that this was the best way to get the cube “soaked” with the least amount of waste and mess.

3. Use a sec or doux champagne for the most authentic result. Brut (dry) champagne was not available in the mid 1800’s, and the original recipes were designed with a sweeter champagne in mind. Perhaps this explains our modern tendency to add sweet flavored liquors.


RECIPE 

Champagne (sec or doux)
Sugar Cubes 
Bitters

Soak sugar cubes in bitters
Place one cube in each glass (flute or coupe), chilled glasses work best
Pour Champagne
Serve as is or garnish with a citrus twist 

In the words of Humphrey Bogart, who was drinking a Champage Cocktail as he said it... 

Here’s lookin’ at you kid! 

Merry Christmas and Best Wishes for 2018
Cheers!
Christine and Stacy 


Saturday, December 2, 2017

Egg Nog- Cocktail of the Month: December

Egg Nog has a long and storied history.  It can be traced to medieval times, when monks drank a milky ale with eggs. Over time the recipe transitioned to what we would consider a traditional egg nog, and then transitioned again to what you buy in the store - which has no “nog” and minimal egg. After researching (we just can’t help it!) and reassuring ourselves that the salmonella risk was minimal to non-existent, we set out to find a “traditional” egg nog recipe to try.

We discovered an authentic recipe "written by George Washington's own hand” (https://www.almanac.com/content/george-washingtons-christmas-eggnog), and decided out of the plethora of options, this was one we had to try!  We reduced the recipe from the crowd sized portion of Mount Vernon’s heyday, to a manageable family or small get together size, and then got started! Our helpful hints and lessons learned are included in parentheses!

Our Recipe
2 eggs
2/3 cups heavy cream
2/3 cups milk
2Tbs sugar
1/3 cup brandy
1.5 oz bourbon
1.5 oz rum (we used Goslings Black Seal, use any dark Caribbean Rum)
0.5 oz sherry

Mix egg yolks and sugar with a hand mixer until frothy.
Mix in dairy to egg yolk mixture.
Add mixed liquors slowly while beating so that they do not cook eggs (if you add the alcohol too quickly, the eggs will literally cook- this is why the salmonella risk is minimal- a slow, steady pour will work fine).

Over-beaten whites, Oops!
Beat egg whites (after they have sat and reached room temperature) just until stiff peaks form - do not overbeat! (If you put them in a KitchenAid and walk away or work on something else they WILL overbeat.  They will be very stiff, and it will be much harder to fold them in without lumping). 

Fold into yolk mixture.
Refrigerate to set a few min, hours, days (We chilled for about an hour- mixture will start to separate, but you can shake the container to remix it).
It will mellow with time, (our research indicates that people keep egg nog for a year or longer; we kept it for about a month, the flavors did mellow and mix more over time)
This made 3.5 measuring cups full.

Overall, it was much easier to make egg nog than we anticipated, and it was delicious! The mix of liquors created a blended flavor that did not overfocus on any particular flavor , and the final drink was not nearly as sweet or heavy as the commercially available options. If you love egg nog, definitely give this a try, if you have never really liked it, mix some up and see if it changes your mind!  Note: We found this drink goes quite nicely with a roaring fire in the fireplace!


Merry Christmas and Happy Holidays!
Cheers!

Stacy and Christine

Monday, November 6, 2017

Cocktail of the Month-November: Hot Toddy


Continuing our Fall trend, we are featuring another heated cocktail- perfect for an evening drink when the night air turns cold! When the Hot Toddy first came to our attention on a vintage cocktail list we nearly discounted it all together.  Our first thoughts, even our second and third thoughts, tended to be something like "how good can this be, people used it as medicine?!" Even as we prepared it we were cautious- not expecting too much, hoping it was "OK".

We could not have been more wrong! The Hot Toddy will definitely become a part of our cold weather repertoire.  It was crazy easy to make, only needed ingredients we already had on hand, AND was both tasty and warming.  In fact, we have continued making these at home since trying them out for this blog!  Yummy Cozy!

The drink's origins can be traced back to the late 1700's India (although other variations attribute it to an Irish doctor, prescribing it medicinally), where it was made with liquor, hot water, sugar and spice. It is no surprise that it quickly spread to colder and wetter climates in the UK and American colonies, as British influence spanned more of the globe. As the drink spread, local spices and regional liquor preferences created a number of variations. By the 1830's it had become a common cold remedy used by everyone from grandma down to young children.


RECIPE 

1 Tbsp honey 
1 Tbsp lemon
2 shots Bourbon
boiling water (about 1/2 cup) 

Add first 3 ingredients to Irish coffee glass (or other mug). Pour in boiling water and stir! 
** NOTE the original recipe had 2 Tbsp honey, but we felt it was sweet enough with one!

Cheers and Stay Warm!
Christine and Stacy

Thursday, October 19, 2017

Vintage Halloween Fun - DIY Mash-Up!

Fall is underway, and quite honestly Halloween is sneaking up on me too quickly this year!  While I'm planning a lower key holiday this year, I'm finding myself short on time for any major projects and events.  Anyone else with me?!!  If you just don't have the time, or maybe you are one of those super-together people with large events planned and just need a few more finishing touches (kudos to you), I'm pulling together my favorite vintage DIY halloween projects.  This post is a combo of projects we've done here at Out 2 Lunch, as well as some other fun projects I've found on pinterest and want to try!  Take a Peek!  Get Inspired!  Click on the links to be routed to directions/ instructions, etc.

Fabric Pumpkins!!  These pumpkins were a project Stacy and I did last year.  We had so much fun making them.  And we both constantly get comments on them displayed in our homes, as well as decor at arts shows we attend.  Using vintage fabric, you can tailor them to any decor scheme you have!!  Got some scraps laying around?

Poe Inspired Raven Wreath!! Searching pinterest, I found this Nevermore Fall Raven Wreath Tutorial from 4onemore.com.  As both a reader/book lover and having lived many years in Baltimore during part of my life, I Love THE RAVEN at Halloween!  Naturally, I had to make this one!  Follow the link above to the original post, and create your own adaptation like I did, (pictured left).

Vintage Glass Shade Ghost Lights!!  I have not made these yet, but I really, really want to!  This idea from sadieseasongoods.com from a couple years ago, is adorable!  I can already see these guys lined up along my porch railing.  And of course, anything using vintage materials is a plus in my book!

Vintage Light Fixture Halloween Moon!!  Talk about a fabulous party centerpiece, or decor placed in a window!  Here's another one from sadieseasongoods.com, this time using a round, globe, vintage light fixture.  Such a mood-setter!

DIY Vintage Swizzle Sticks!!  Serving drinks over Halloween?  Here's a perfect Halloween color-combo of our vintage swizzle stick blog post from this past September!  Talk about a fun way to add gothic-glam sparkle to your party drinks, or a just-for-fun mood setter for drinks post trick-or-treating!

And last, but not least, if you're looking for some cute edible ideas?  Stacy pulled together this post of fun Halloween Foods last year.  Check it out for some quick, simple, fun inspirations!!  Kid Tested!

 Happy Fall, Safe Trick-or-Treating for all, and as always,

Cheers!
-Christine and Stacy

Links are also available here on our Out 2 Lunch pinterest board "Blog Sources"

Wednesday, October 4, 2017

Cocktail of the Month - October: Port Sangaree

As the calendar turned to fall (even if the weather isn't always there...), we began to look for a vintage cocktail that would be perfect for sipping on a crisp evening. We discovered the Port Sangaree, perhaps one of the oldest cocktails around. Although the name is similar (and has the same root) as sangria (circa 1961), the Port Sangaree has been around since at least 1774!

Most reports have this drink originating in the brothels of the Antilles Islands - frequented most certainly by sailors transporting goods along various trade roots. This may explain how such an exotic, for the time, array of flavors became a part of the "house punch" that was served. The Sangaree combines citrus and spices with a rich port. All of which would have been easily accessible along Caribbean trade routes.

There are many variations today, including added sugars, fruits, cordials, and even chilling over ice.  Being fans of straight Port,  we weren't too sure what we'd think of the mixed flavors. We decided to go all the way back to the oldest recipes we could find and work from there.  The basic starting point for Port Sangaree is simply warmed Port wine and nutmeg. After trying the Port Sangaree we give it 2 thumbs up- it's warm, easy to sip and just makes you think of fall!


RECIPE

Start with a decent bottle of Port wine and warm 5-6 oz in a small saucepan with a few sprinkles of nutmeg.  Once warm, pour into a mug and top with a bit more nutmeg.  That's it!  Enjoy!!

Note: There are many different varieties of Port, and many different flavors of Port, so beginning with a Port you like is an important starting point.  We chose Quinta Das Carvalhas Reserva Tawny Porto, and found it reasonably priced, nicely flavored, and an excellent base for spicing into a Sangaree.  As previously mentioned, if you would prefer other spices, fruits, flavors, sweeteners, etc - add away.  We would suggest, however, giving the original a taste before you embellish.  It is so simple and truly delicious!

Cheers! 
Christine and Stacy

Wednesday, September 20, 2017

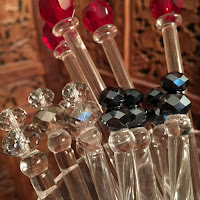
DIY Vintage-Glam Cocktail Swizzle Sticks!!

With all the vintage cocktails we've been researching lately (see our vintage cocktail of the month), I've also run across a lot of vintage bar-ware pieces - So Fun!  One evening, ordering vintage glass swizzle sticks for my husband and myself, the idea to dress them up with sparkly, vintage, glass beads popped into my head.  Sparkles, Vintage, and Cocktails - Yes Please!...I decided to give it a try!  Here's what I did:


Materials:

Vintage Swizzle Sticks: I ordered simple, glass, vintage cocktail stirrers or swizzle sticks (different sellers label them differently) on ebay.  You can also keep watch and sometimes pick them up at thrift and antique shops.  Some of the swizzle sticks have rounded ball ends, some have little flat tops.  The flat tops are often designed to be used in drinks as muddlers, however, since I was looking to decorate mine, those flat tops provided a lovely bead platform.  Vintage swizzle sticks also come in a variety of lengths.  As my husband and I tend toward drinks served in Double Old Fashioned glasses, martini glasses, coup glasses, etc., I personally preferred the short 4"-5" sticks when I could find them.  If you tend towards drinks typically served in Highballs or taller glasses, look for the longer glass swizzle sticks.  It's also not a bad idea to make a variety of lengths, just in case!

Vintage Beads: Again, these can be found in a variety of places, online, thrift shops, etc.  Oftentimes buying one necklace and cutting it apart, can yield 10-20 beads depending on how many you are using and what size they are.  My recommendation is to use glass/crystal beads over plastic or wood as they are easier to clean, however, any would work.  The beads I used ranged from 1" (abstract large beads) and 3/4" (amber disks), to 3/8" (small gray beads topping larger gray beads).

Glue: I used E-6000

 The process is simply to glue the pieces together.  The most difficult aspect I encountered was where to place them to let them dry and set in an upright position.  I had this spikey "grass" drying rack I had gotten for bottle components when my children were little, which proved the perfect place to stick them upright, (a bucket of sand might work too?)!  Initially I did not scuff or "rough-up" the glass pieces prior to gluing.  Some of them held together well, some did not.  Those that did not hold, I filed with a small metal file and tried again.  So far, they seem to be holding.  I have used some in drinks, (stay tuned to our future cocktails of the month blogs-you'll spot some of these lovelies), and washed them successfully.  I would caution that they are delicate, and to handle them with care.

They are also, super sparkly, and loads of FUN!  I kept finding beads that would be "perfect" for a swizzle stick and ended up making quite a few...so now that everyone knows what they're getting for Christmas....   lolol

Enjoy, have fun, and Cheers!
If you make some, tag us on instagram - we'd love to see how they turned out!!
-Christine


Thursday, September 7, 2017

Cocktail of the Month-September: Old Fashioned

Labor Day- summer is coming to an end, but it's not quite fall. As we thought about a drink that captured this feeling, we decided to feature the classic Old Fashioned with a few variations.

The Old Fashioned is among the most classic of cocktails.  References to this classic bourbon (or whiskey) drink date back to 1806; it may in fact have been THE original cocktail. What we do know: in the 1800's a cocktail was comprised of bitters, a sugar cube, a dash of water and your spirit of choice- you could order one with most any alcohol as the base. Sometime in the late 1800's the bourbon variety picked up the Old Fashioned moniker- leading to the idea that it may have been the original, or just the one that best stood the test of time.

What we love most about this drink is it's simplicity. Free from the over sweetness of many modern cocktails, you can really enjoy the bourbon you are paying for - which incidentally means you should start with a bourbon you enjoy straight.

Traditional Old Fashioned recipes call for a sugar cube muddled with a few dashes of bitters and a splash of water. Although this is ideal, most agree that a rich simple sugar (2:1 ration sugar to water) is a reasonable replacement. (Use about 1\3 oz of rich simple syrup/drink).

We also tried a few variations on the Old Fashioned- although they are not traditional. We found that using a fruit bourbon- cherry and peach specifically- brought us a flavor profile that reminded us of the summer to fall transition. We omitted the sugar cube, using just a few dashes of bitters and the bourbon - plus ice. as the fruit bourbons are sweeter on their own, Purists would gasp, I am sure, but if you are just experimenting give it a try!


Cheers and Happy Fall!
Christine and Stacy

Wednesday, August 2, 2017

Cocktail of the Month- August: Sidecar


The Sidecar, like many vintage cocktails, appears to be of dubious origins. Many tales credit its creation to Harry's Bar in Paris- inspired by an American officer during World War One. Others have a similar story substituting London's Buck's Club. The most reasonable (I think) explanation being both establishments based their drink on an old 19th Century cocktail from - where else- New Orleans. 


If one traces back the recipe, it takes on a distinctly New Orleans flair. The mixture of French Cognac and Curaçao from the Spanish Islands reflects the mix of nationalities  present in the very distinct world of New Orleans.  Curaçao, over time, was replaced by Cointreau - as the drink gained in popularity and needed an orange liquor that was reliably and consistently produced (the early Curaçao was not). When Curaçao production stabilized it included blue food dye- which would totally change the classic look of this drink. 

In the French style, the Sidecar is made with equal parts cognac, Cointreau and lemon juice. In contrast the English sidecar has 2 parts cognac to one part Cointreau and one part lemon juice. Traditionally the glass is rimmed with sugar (orange infused if you are really fancy) and garnished with an orange peel twist. 

We chose to make our sidecar in the English style - as we prefer a lighter citrus note- and eliminated the sugar - rim as we don't like overly sweet flavors.  We used Christian Brothers XO Brandy - if you have a favorite brandy its a great substitution. 

We enjoyed the the flavor of this drink, and it's perfect for a hit August night! 

RECIPE 
2 oz. Cognac 
1 oz. Cointreau
1 oz. Lemon juice (we used fresh squeezed) 

If you choose to rm the glass, rub it with the squeezed lemon and dip into a plate of sugar. 

Measure liquids into a shaker of ice, shake well, strain into your rimmed glass and enjoy! 


Cheers! 

Christine and Stacy 


Tuesday, July 4, 2017

A Year Of Cocktails: July- Classic Margarita

July... That month of lazy, hazy days days at the beach, on the back deck or by the pool. We are all looking for ways to be cool and refreshed while enjoying the slower pace of warm evenings with friends and family. We are featuring the classic margarita this month, as it is a perfect drink for such occasions. Easy to make, with limited prep/clean up time; it's cool, refreshing and has the citrus flair that always says "summer" to me! 

If you hear Margarita and think of the cheap, fruity and frozen concoction that you imbibed as a 22 year old co-ed we don't blame you. The frozen margaritas seem as plentiful as they are cheap and headache inducing.  However, they are only distantly connected to the Classic Margarita. The classic is much more refined, a smooth sipping drink well enjoyed as you watch the sun set over the city or the water. 

The history of this classic drink is cloudy at best- with many different bartenders, and a few socialites, claiming to be the originator. Many of the tales involve a woman named Margarita as a bar patron, and one even makes reference to movie icon Rita Hayworth (née Margarita Cansino). What is clear? The cocktail originated in the late 1930's or early 1940's, as it was being advertised by Jose Cuervo by 1945.

The story that most resonates with us comes out of the prohibition era speak-easies. The Daisy was a popular prohibition era cocktail comprised primarily of brandy and citrus, though it originated in the late 1800's. Following the repeal of prohibition, other spirits began to be substituted for the brandy- including tequila. And the Spanish work for Daisy, you guessed it- Margarita!! 


RECIPE  

  • 2 ounces tequila made from 100 percent agave (the key to avoiding headache!) 
  • 1 ounce Cointreau/ Triple Sec 
  • 1 ounce freshly squeezed lime juice
  • Salt for garnish
Rub lime around rim, dip glasses in a small dish of salt, combine ingredients in shaker, shake with ice and strain or serve on the rocks 


Cheers.... Stacy and Christine  

Thursday, June 1, 2017

Bellini: A Year of cocktails - June

For this month's cocktail we returned to a classic favorite- one you may have ordered out but may not have made from scratch. It's a quintessential summer fav - light, refreshing and fruity- with the exotic flair of Italy. The Bellini!

The Bellini originated in post-war Italy (most reports date its inception at 1948/49), at Harry's Bar in Venezia.  The setting itself oozes romance and style, nestled just off the Grand Canal. The allure of Harry's is heightened by the fact that it was frequented by Humphrey Bogart, Earnest Hemingway, Sinclair Lewis, Orson Welles and Truman Capote. I can only imagine the deep conversations and the great works of literature that originated within its walls. And with that, it's easy to see cultured men and women sipping Bellinis in the warm evening hours as they look out over the scenic Venetian landscape.

According to legend, the Bar's proprietor Guiseppe Cipriani delighted in creating simple yet delicious dishes and cocktails using ingredients from neighboring areas (much like the current fresh and delightful return to "farm to table cooking"!).   Rumor has it, he particularly adored the regional specialty white peaches. He created a purée and combined it with Prosecco- the local sparkling white wine. For several years this house specialty was only available during the peak peach season (June-September) and all of the purée was handmade at the bar. As the technology became available to flash freeze the purée, the drink spread both to Harry's New York location and to year round availability.

In a way that seems just what I would expect from a Venetian establishment, the Bellini was named for a 15th century local artist- Giovanni Bellini- who featured a peachy pink color in his paintings that mirrors the color of a true Bellini.

Create your own Bellini with peach purée (from fresh or frozen peaches) and a traditional Italian Prosecco, and enjoy it this summer as you watch the sun set from your back porch. Bonus points if you read Breakfast at Tiffany's while you sip.

Salute!
Christine and Stacy

RECIPE 

One part peach purée
Two parts Prosecco

Serve in a chilled champagne flute

Tuesday, May 23, 2017

Vintage Style, Modern Twist

What to do with family heirlooms, particularly jewelry, always seems to be a tricky topic. So often grandma's jewelry gets passed down to children, grandchildren and great-grandchildren that truly want to have a memento to remember their loved one, but they just don't know what to do with it. Sometimes grandma had a very different build or style and the pieces just don't look right on the recipient, sometimes they are so dated they don't fit with anyone in the family, and sometimes there's a beautiful piece that has some damage that makes it unwearable.

I was in this situation a few summers back, when I received a collection of jewelry from my grandmother's estate. There are some pieces I love, and wear as is. Many others I wanted but didn't know what to do with. They have been in a cedar chest through two years and a move- lately I've been really thinking through what to do with them... I want to create something that I will use regularly, and that will really showcase the pieces.  We (Christine and I) came up with some fun ideas that we're sharing with you! 

Some pieces are an easy DIY project, you can alter them yourself in a non-permanent way. I received a set of blue ceramic beads, to which I added a vintage enamel brooch - it made the perfect July 4th accessory.

Christine has a collection of vintage milk glass and metal necklaces that she has knotted off and wears for a modern, casual look.  Rather than buying "new" accessories, check out some local thrift and antique shops, or search around on e-bay, etsy, and poshmark for fun vintage finds. You never know what's out there just waiting to be found!

Vintage Jewelry - Out2LunchDesigns
Some pieces, on the other hand, require more work to make it into your wardrobe. For this you need professional assistance- which we have just added to our repertoire! We'd like to introduce the Out 2 Lunch custom line! (Not sure why it took so long to come up with this - probably because it's a little scary to work with other people's heirlooms, and we want to make sure we get it right). Our clients can be as involved, or not, in the design process as they choose to be. Some people just know that they want to use certain pieces- maybe to create a set of gifts for all the children and grandchildren, or maybe to enhance a special day with a sentimental or special heirloom piece.
Fabric Swatches - Out2LunchDesigns

Once we receive the jewelry we sort through our fabrics and come up with fabulous combinations that suit the pieces. Other folks have in mind a color scheme or a certain style they want to capture- in that case, we will work (in person and or via email) to find the perfect fabric to meet their vision. Once we have the design elements in place, we create one of our high quality, handmade clutches - seamlessly incorporating their family pieces. When we are done, everyone has a memory that they can incorporate into their life! 

This can also be a popular wedding option. For a few years, the "brooch bouquets" we're popular. Though beautiful, they were often very heavy and not useful for anything but decor afterwards. We are now offering the chance to create a wedding keepsake you will use for years!

Incorporate family jewelry as the "something old" on a clutch for the bride, create a set for the bride and her mother, or create a bridesmaids set - using your jewelry or ours. Our design style and attention to detail will help you to create a keepsake that will be treasured for years.

Check out our website www.out2lunchdesigns.com/home/custom-orders for more details, we'd love to help plan something special for you!  Plus, show us your pics of vintage jewelry used along with today's styles! (tag us on Instagram!)

Happy Creating and Styling!
Stacy and Christine

Tuesday, May 9, 2017

Thanks - To Moms and Teachers!


It's that time of year when we recognize  people that are so important in the lives of children... As I sat down to write this blog, I was struck by the fact that Teacher Appreciation Week and Mother's Day are both in early May.  In fact, this year Mother's Day falls just after National Teacher Appreciation Week concludes.  So.... we are sharing with you an easy project that you can share with a teacher, your mom, or anyone else that needs a little brightening in their day! 

One of the best things about having a partner in a creative business is having twice the brainstorming power! Last winter we were talking about how many teachers our children have (as they switch classes even in elementary school) and what would be good end of year gifts that the teachers would (hopefully) enjoy, would be unique and in keeping with our goals of being vintage inspired, earth friendly and supporting local economies, and would be cost effective since we had so many to make! 


As we often do, we turned to Ebay for inspiration.  We discovered a vintage tea set being sold at a great price as it was missing a few pieces, and took off from there. Once we realized that there were enough
remaining pieces for all of our teachers, we put in the bid and began to flesh out the rest of the project.  

The tea cups, creamer and sugar bowl became the perfect planters!  Our children had some input on which plants they wanted to use, so their personalities are reflected as well, and they had a ball helping us assemble the mini planters.  Feel free to borrow from our ideas, and make changes to make it your own! 

We'd love to hear how you have used vintage pieces in your gardening or about fun gifts that you have created - please share your ideas in the comments below! 


Happy Spring! 

Stacy and Christine

Monday, May 1, 2017

Mint Julep: A Year of Cocktails - May

This month's cocktail is inspired by a little horse race coming up at the end of this week... 

When we began brainstorming our Year of Cocktails, May was one of the months that we instantly had a plan for - and the same plan no less (which is saying something for the two of us).  When you live in the south, there are few things as iconic as the Kentucky Derby and the connected pageantry.  Everyone pictures the fabulously dressed women, Derby hats perched atop their heads, and of course they have mint juleps in their hands.  If you ever wondered why juleps are served in little silver cups, if you are hosting a Derby Party and are unsure of intricacies of this classic drink, or if you are a history and science nerd like me - this is the blog post for you! 

Although written references to juleps exist prior to the 1875 advent of the Derby, due to excellent marketing and branding the two are forever linked in the minds of most Americans.  The first references to juleps at the Derby appear in 1938, which makes sense as Prohibition ended in 1933 and America was emerging from the throes of the Great Depression in the late 1930's.  Americans were ready to get out and have a good time, forget about their problems for a while, and enjoy an drink that symbolized wealth and stature.  The julep's history made it a perfect fit - in the days before home refrigerators, even having the available ice to make the drink was a sign of wealth. Combining that with the requisite silver cup, and the staff to make such a labor intensive drink was surely a sign of a very affluent family; and the additional bonus of being made with local Kentucky bourbon made it the perfect signature drink for an event that was fast becoming a symbol of wealth, history and class in the American South. 

We had our silver cup, we had ice, bourbon, sugar and mint - we thought we were ready to whip up the perfect mint julep.  I am here to tell you - the recipe for a julep looks deceptively simple! We even had an official mint muddling stick! We muddled our mint (basically smashing the mint leaves to release the flavors), we put in the ice and the other ingredients and we stirred... then waited for that classic super-frosted cup. Nothing! A little bit of condensation perhaps, but no super cool frosted julep glass. We went back to the trusty internet, pulled up all the recipes we could find and looked for something we had missed. Some recipes called for a splash of water, in addition to the standard ingredients - surely this little splash of water couldn't make the difference we thought? 

But we had nothing to lose, so we gave it a try.  Amazingly, we added the water, stirred vigorously, and behold - the glass iced, instantly and dramatically! If you are just interested in having the perfect julep, you can stop reading here, skip to the recipe at the bottom, and enjoy your fabulously iced silver cup (you're welcome....).  However, if you are like Christine and I and need to know WHY this works, read the next paragraph.  We were fascinated.... 

Full disclosure, as I write this, I am a science/ math nerd, but I tend much more towards the life sciences - thermodynamics was never my strong suit, so this is totally my lay person's understanding of the information... We figured that there must have been some sort of chemical reaction going on, so we started by hitting up the research chemists and engineers in our immediate social circle. Despite the fact that they all thought that we were crazy - because who really calls someone out of the blue to ask about drink glasses that "magically" frost - we hit on the phrase "heat of enthalpy".  Then we were off to the races, so to speak.  A google search and some reading later, we had it figured out (sort of)! The simple syrup (sugar supersaturated in hot water), the bourbon and the ice are a closed system with a defined amount of energy. When you add a splash of water and stir, as I understand it, several things happen simultaneously. The freezing point of the ice/water combination is lowered, due to the alcohol in the bourbon, this results in a melting of some quantity of the ice in order to reach a state of equilibrium,  In addition, the dropping temperature changes the solubility of the sugar in the simple syrup - just as you had to heat the water in order to dissolve that much sugar, the cooling of the solution causes some of the sugar to recrystallize.  Both of these things - the melting and the recrystallizing - use energy that removes heat from the closed system.  As the system loses heat, it chills the glass so severely that any moisture in the air (that would normally form condensation on the glass) actually freezes.  To create the ideal situation for a perfectly frosted julep cup, you need the following....
 1. A good recipe
 2. A full cup of ice so that the temperature balance works correctly 
 3. A vigorous stir
 4. A real silver cup - as silver is the best substance for conducting heat and cold
5, A good dose of Southern humidity in the air to provide enough water vapor to freeze

Because we are a bit artsy and creative (and have young daughters), in addition to being nerds, we took our new-found knowledge one step further.... If the freezing effect of the julep cup is caused by agitation in the system drawing the heat, it's the only natural explanation for the mysterious powers of everyone's current favorite Disney princess! If you have "Frozen" fans in your house, and have seen the movie as many times as we have, you will remember that Princess Elsa's ice "powers" grow and spin out of control whenever she is becomes overly upset/angry/scared etc. As her emotions swirl and her feelings build in intensity they seem to draw the energy from the environment - setting off an eternal winter in Arendelle. So as an added bonus to our cool drink experiment, we solved a Disney mystery as well! 

We hope that you have enjoyed learning from our experiences and that you will drink a fabulous julep as you cheer your favorite horse to victory in the Derby this weekend!

RECIPE

  1. Place the leaves from 4-5 springs of  mint and 1/2 oz  simple syrup into a julep cup
  2. Muddle well to release the oil and aroma of the mint.
  3. Add 2.5 oz of your favorite bourbon.
  4. Fill with crushed ice, add a splash of water,  and stir well until the glass becomes frosty.
  5. Garnish with the mint sprig.


Cheers!

Stacy and Christine