Showing posts with label fabric pumpkins. Show all posts

Thursday, October 19, 2017

Vintage Halloween Fun - DIY Mash-Up!

Fall is underway, and quite honestly Halloween is sneaking up on me too quickly this year!  While I'm planning a lower key holiday this year, I'm finding myself short on time for any major projects and events.  Anyone else with me?!!  If you just don't have the time, or maybe you are one of those super-together people with large events planned and just need a few more finishing touches (kudos to you), I'm pulling together my favorite vintage DIY halloween projects.  This post is a combo of projects we've done here at Out 2 Lunch, as well as some other fun projects I've found on pinterest and want to try!  Take a Peek!  Get Inspired!  Click on the links to be routed to directions/ instructions, etc.

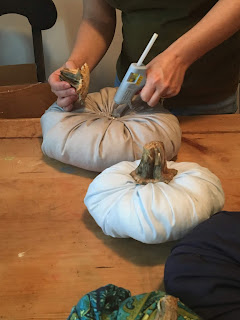
Fabric Pumpkins!!  These pumpkins were a project Stacy and I did last year.  We had so much fun making them.  And we both constantly get comments on them displayed in our homes, as well as decor at arts shows we attend.  Using vintage fabric, you can tailor them to any decor scheme you have!!  Got some scraps laying around?

Poe Inspired Raven Wreath!! Searching pinterest, I found this Nevermore Fall Raven Wreath Tutorial from 4onemore.com.  As both a reader/book lover and having lived many years in Baltimore during part of my life, I Love THE RAVEN at Halloween!  Naturally, I had to make this one!  Follow the link above to the original post, and create your own adaptation like I did, (pictured left).

Vintage Glass Shade Ghost Lights!!  I have not made these yet, but I really, really want to!  This idea from sadieseasongoods.com from a couple years ago, is adorable!  I can already see these guys lined up along my porch railing.  And of course, anything using vintage materials is a plus in my book!

Vintage Light Fixture Halloween Moon!!  Talk about a fabulous party centerpiece, or decor placed in a window!  Here's another one from sadieseasongoods.com, this time using a round, globe, vintage light fixture.  Such a mood-setter!
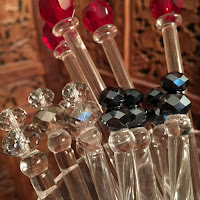
DIY Vintage Swizzle Sticks!!  Serving drinks over Halloween?  Here's a perfect Halloween color-combo of our vintage swizzle stick blog post from this past September!  Talk about a fun way to add gothic-glam sparkle to your party drinks, or a just-for-fun mood setter for drinks post trick-or-treating!

And last, but not least, if you're looking for some cute edible ideas?  Stacy pulled together this post of fun Halloween Foods last year.  Check it out for some quick, simple, fun inspirations!!  Kid Tested!

 Happy Fall, Safe Trick-or-Treating for all, and as always,

Cheers!
-Christine and Stacy

Links are also available here on our Out 2 Lunch pinterest board "Blog Sources"

Tuesday, November 1, 2016

Out 2 Lunch Thanksgiving - A Tale of Two Tables

Thanksgiving is coming, and we here at Out 2 Lunch are prepping our tables for dinners and gatheringsSo, what are we decorating with?


Common Themes: Pumpkins, Berries, Acorns, other Natural Elements (leaves, seed pods).  But how we each use those elements?  And what tones/colors they are?....

milk glass, mercury glass, vintage glam table
Christine:  My table mixes my love of vintage elements with my love of glam.  One of my favorite decorating looks mixes white vintage milk glass with mercury glass for lots of sparkle and shine.  With all that shiny metallic, what better to soften the look and add more glam texture than this fabulous table runner edged in white feathers!  I just recently came across this shopping, and absolutely could not resist it!  Keep watch, this one will show up in various places throughout the holidays.  

My center bowl I filled with "natural" pieces, with a bit of a twist.  I have two small handmade fabric pumpkins, as well as a handful of handmade matching acorns.  The shiny and matte silver fabrics tie in with all the mercury glass.  Under the pumpkins and acorns are my gold magnolia seed pods.  These are a favorite decorating item for me, always located somewhere about my house.  Growing up in the south, I had a couple of huge, old magnolia trees in my yard as a child.  These were my climbing trees.  I could frequently be found 20+ feet up in the air, lounging on branches, reading or day dreaming.  Needless to say, magnolia's have always held a special place in my heart. 
hand made pumpkins, magnolia seed pods - c/o Out 2 Lunch
A couple years ago on a hike, I happened to find a number of fallen magnolia seed pods in good condition.  I brought them home, dried them and then spray painted them antique gold.  I absolutely love the shape and intriguing look of the pods, and rotate them around regularly between bowls and centerpieces.  The antique gold gives them a lovely shine and really brings out the spiky texture in them.  So my table incorporates a lot of sparkle and shine, glam textures, and vintage and handmade items which are special to me, allowing me to share those pieces with the special people in my life.  Happy Thanksgiving!


StacyTo me, fall, and Thanksgiving in particular, has a very warm and organic vibe. It is about the changing of the seasons, the colors of the leaves and the nip of cold in the air. I combat the chill (with which I have a love/hate relationship) by creating a tablescape filled with rich, warm colors.  I picked up these cornucopia years ago, when I was newly married, and they have been featured in various locations of our fall décor over time. This year, as we adjust to our move, they needed a new home. I chose to make them the focal point, and build my centerpiece around them. They are filled with fall fruits and vegetables, and provide a great opportunity to discuss early American life with my children (who are studying the complicated relationship between the Jamestown Settlers and the Powhatan Indians in Virginia Studies). 

Did you notice some of those small fabric pumpkins we made this fall managed to transition into both of our centerpiece designs? My pumpkins were a beach color scheme, but this one just happened to work - the fabric had a rustic organic feel, that was the perfect compliment to my design!  Completely unplanned, but talk about a versatile little decor piece!  Follow THIS TUTORIAL to make your own.  


Wishing a Wonderful, Joyful Thanksgiving for all! 

Cheers,
Christine & Stacy

Tuesday, September 20, 2016

Vintage Fabric Pumpkins - DIY!!


With September, comes full-fledged pumpkin season!  It's pumpkin everything! - pumpkin spice coffees, pumpkin lattes, pumpkin bread, pumpkin bars, pumpkin decor.  If it's pumpkin, it's currently here! Pumpkin, Pumpkin, Pumpkin, Pumpkin...

So in the pumpkin spirit, we here at Out 2 Lunch got busy making some pumpkin decorations for our homes.  A couple years ago, I found this pinterest tutorial for velvet pumpkins that I loved.  I made a whole series of pumpkins in velvets and satins that now decorate my home, my mother's and mother-in-law's homes, as well as the homes of some of my friends.  I was on a pumpkin roll!

With our love here for vintage fabrics and creative re-purposing, Stacy and I decided to make some fabric fall pumpkins using re-purposed clothes.  We both picked some items (shirts, skirts, etc.) that fit the color scheme looks we each wanted.  You can definitely see some of our personality differences here!  Stacy chose some gorgeous blues/browns for a very beachy blue fall look.  And I definitely went for a more silver/black gothic glam look.


We had SO much fun making these and we're sharing our process as well as our hard-learned do's and do not's!

Have fun, re-purpose and we'd love to see your pics!  In fact, tag us on instagram (out2lunchdesigns) with your fabric pumpkin pics and we'll re-post them!

Materials:
     Clothing/Fabric to cut up 
     Doll Making or Decorator's Needles
      - very long sewing needles
     Dried Pumpkin Stems or Stick Pieces
     Heavy Duty Thread
     Cotton Stuffing
     Sharp Scissors
     Hot Glue Gun & Glue


Step One: Cutting
Cut your fabric into large circles (doesn't need to be exact).  Keep in mind that the pumpkin will be almost half the size of the circle when finished (ie- 12" circle will make roughly a 6-7" pumpkin).  For very large pumpkins, cut 20" or larger diameter circles.

Step Two: Sewing
Run a long, doubled piece of Heavy Duty Thread through your long needle.  Make sure to use strong thread (we had some break as were tying off our pumpkins, and had to start them all over)!  To sew the pumpkins start on one edge and run the needle around the edge using a loose up and down running stitch..  It doesn't have to be perfectly even, and a loose stitch 1/2" wide is fine.  Make sure though that you have enough thread to go all the way around with some hanging out each end.  The fabric will gather as you sew and push it along the thread.  Once stitched all the way around, gently pull the strings on both ends to gather the pumpkin in, leaving about a fist-sized hole at the top.


Step Three: Stuffing
Carefully stuff wads of cotton into the pumpkin to fill to desired plumpness.  More stuffing yields a rounder, more ball like pumpkin; slightly less stuffing makes a squattier, wider pumpkin.  Once stuffed, pull strings together to close stuffing hole and tie into a knot. Be gentle with this - this is where we broke some threads!


Step Four: Finishing
You now have a nice round stuffed ball.  Re-thread your long needle and knot the end.  Run your needle/thread back and forth across the edges of the closed off hole a couple times, just to pull them tighter together, tie off thread.  Next, run your needle/thread straight down through the gathered edges, through the pumpkin, and out the bottom of the pumpkin.  Turn your needle around and run it back up.  Repeat this step a couple times, gently pulling the top and bottom of the pumpkin towards each other.  Knot and cut off thread when done.  This will indent the top and bottom to form a more realistic pumpkin shape.  You will really need the long doll needles for this step, especially with the larger sized pumpkins!

Step Five: Stem
Once all sewn, select the dried pumpkin stem of your choice and hot glue the stem to the top of your pumpkin.  Pumpkin stems can sometimes be obtained from farms and pumpkin patches.  There are numerous options for sale on ebay and Amazon.  I have also seen pumpkins made using a stick piece for the stem.  Whichever stem option you choose, make sure it is well dried so it does not rot or mold.


Then display your pumpkin and enjoy it for years to come!   

Happy Fall Y'all!!


Cheers,
Christine!